Tuesday, March 23, 2010

Make your own Tomato Baskets


My daughter picking tomatoes. Summer 08.

Tomato baskets are an important tool for any garden. We use tomato baskets for lots of vegetables, including cucumbers, beans, peas, tomatoes, peppers, tomatillos or even just young seedlings in our orchard that need to be protected until they are a little larger. These are made from 4' tall, 2" x 4"pattern, fence fabric that is cut into 3-4' sections that are then rolled into cylinders. You can buy the 14 gauge, galvanized, welded wire fence fabric in 50' or 100' sections. If you buy a 50' section, you can make about 14 tomato baskets. I expect my tomato baskets to last about 10 years each. If you go with a thicker steel (heavier gauge wire) they will last longer, but they are much harder to cut and bend into baskets, and the fence fabric costs a lot more. With 14 gauge wire you can easily cut them with a simple wire cutter or pliers that have a cutting area above the handle.


The stubs where the fence fabric is cut (to make 3-4' sections) are bent over to attach the two ends to make a cylinder.


The bottom is then cut off so that there are 4" prongs that will stick into the ground to stabilize the basket anchored into the ground.

These prongs stick into the soil to hold the basket in place.


Young beans and okra growing up with the support of tomato baskets to pretect them from critters as well as support them as they get taller. They also provide the structure for vining peas, beans and cucumbers to climb.


A young Pecan tree with a tomato basket protecting it from deer rubbing in the winter.


I also place these around young Blueberry and other berry bushes until they are large enough not to be trampled by kids or dogs. Tomato baskets are a very important part of gardening at our house.


In the off season these stack well for storage.


Sustainable Ideas and Projects

Click on the links below for content!

Concept Plan for a Sustainable Home

DIY Hoop House

Solar dehydrators

Tomato Cages

Water Storage and Irrigation: More on this later.

Home Heating: More on this later.

Root Cellars

Tuesday, March 16, 2010

Dividing Blackberries and Strawberries

Last fall (2009) I had a bunch of blackberries that were spreading into areas that I did not want them. I have a lot of fiends who have commented on how they might want some so I pulled them out of the ground where they had rooted and put them in trash bags with moist peat moss to over winter the rooted divisions. I checked on them a couple of times over the winter and added water to them when they were dry. Even though they were kept in my dark garage and they were dormant they still needed to stay moist to remain viable this spring. I took them out the other day and set them in a puddle on a rainy day while I rounded up pots to pot them up.
Blackberries send out new arching branches that root when they touch the ground. They are one of the easiest plants to divide and plant elsewhere or give away to friends.

Moistening the roots in a puddle on a rainy Spring day in March.

Our compost area is simply an area on an old concrete barn slab that we have divided into two areas using concrete blocks. We alternate new and aged compost so that we always have an area that is ready to be used and one area that is ready to accept new yard, kitchen, and garden waste. This compost is not quite as broken down as I would like to pot up plants, but blackberries are so tough, I felt comfortable potting them directly into this compost as a soil medium.

Great worms in our compost.

Blackberries potted up and ready to give away or move to a new location after a month of growing.

These strawberries are growing into my aisles and need to be divided. They also can be easily dug up and either directly planted into new areas or potted up to give away.

Planting Peas and Garlic

I am excited to get started planting peas, garlic, onions, and other cool season veggies, but first I have to clean up my bermed-up wide rows.

Wide rows full of weeds in March.

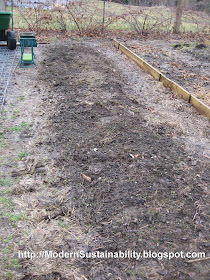
Wide rows weeded and ready for garlic and snap peas.

These weeds are going to the compost pile.

Our compost pile is divided into two areas, one new compost and one that is aged and ready for use. When the aged stuff is used up, I start over with the new garden weeds, kitchen and yard waste in it's spot and let the older stuff continue to break down. This compost area is merely concrete blocks dividing a portion of an old concrete slab up into two spaces.

Garlic cloves ready for Spring planting. I could have planted these in the fall and they would have gotten a head start, but it is still fine to plant garlic and onions in the early spring. These have already started to sprout so I have to be careful handling them and planting them.

Garlic ready to be planted.

Garlic spaced 6" apart and ready to be covered up with a little bit of soil.

We are experimenting with 5 different types of Snap Peas. I love Snap Peas and we are still experimenting with different varieties to see which ones do the best in our area and different times of year.


We use tomato cages for lots of vegetables, including cucumbers, beans and peas. This does not look like much, but I am excited to finally get some plants in the ground. Next we will plant onions, lettuce, spinach and carrots.